Installing Noggit for Epsilon SL
Guide by NORTE.m2 · Version 1.0
This is an adaptation of the following guides with additional information:
- Noggit Installation: https://marlamin.github.io/modern-map-making/
- Video Tutorial: https://www.youtube.com/watch?v=TP8YpgiGOPs
Other useful links (not required)
- Modern Map Making Discord: https://discord.gg/C85673kkWd
1 — Download the required programs
A WoW 3.3.5 client
Noggit can only run on this specific version. You'll need a 3.3.5 client.
I downloaded mine from https://www.chromiecraft.com/en/downloads/, but there are many other sources online. Any clean 3.3.5 client will work.
Noggit
The main program.
You can grab the latest version in their Discord channel: https://ptb.discord.com/channels/1264317233190928385/1264319052583801059
At the time of writing, the version I'm using is: https://marlam.in/u/FrankenNoggit12092024.7z
Map Upconverter GUI
This tool converts maps from Noggit's format (Lich King) to Epsilon's format (Shadowlands).
Latest version available in the same Discord channel above.
At the time of writing, the version I'm using is: https://github.com/ModernWoWTools/MapUpconverter/releases/download/0.9.7/Release-win-x64.zip
The global.cfg file
Also available in the Discord channel mentioned above.
At the time of writing, the version I'm using is: https://drive.google.com/file/d/1fmUnoNQEvWKrN6bvF1lR316cTQhGb1VR/view?usp=sharing
2 — Download the modern assets
We need to download assets from newer expansions (textures, WMOs, etc.) so they're available inside Noggit.
There are two patches:
Patch N (15 GB): https://drive.google.com/file/d/1i0KWP8fmiEGjFi5tIP-Lo-POpxyHwPzU/view
Patch Y (10 GB): https://drive.google.com/file/d/1nUzJ7oSf87WaN_OMCx90lzHaZXSofPj5/view
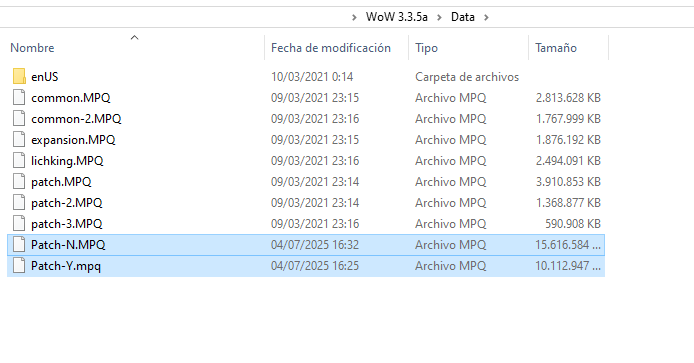
Once downloaded, place both patches inside the Data folder of your WoW 3.3.5 client.
3 — Set up the Noggit folder
Inside the Noggit folder, create a folder where you'll store your future projects.
You can name it anything: "Projects", "Noggit Projects", etc.

You must create a folder for each project before creating the project in Noggit — the program won't create it for you. For this setup, our test project will be called "My First Project".
You'll need to create a test project first so that Noggit generates all the necessary internal files.
Step 1 — Launch Noggit
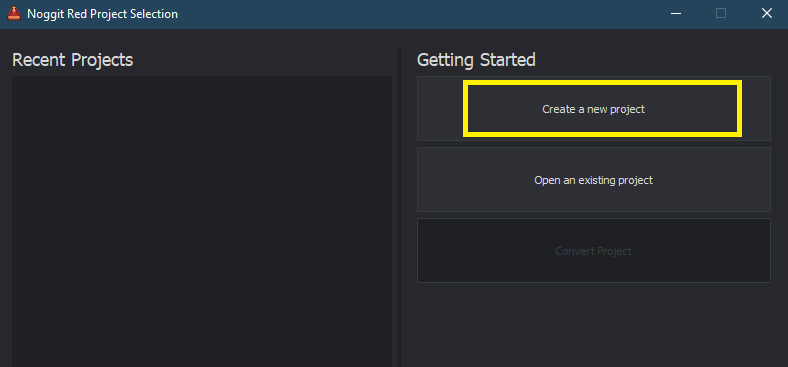
Create a new project. This is just a TEST — you can delete it later.
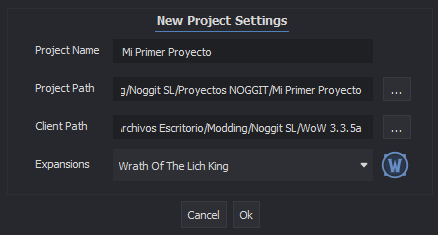
- The project path is the folder for this project. Each project gets its own folder.
- The client path is the folder where your WoW 3.3.5 client is installed.
Click OK, then double-click the project to open it.
Step 2 — Enable Modern Features
This only needs to be done once. You won't have to repeat it for future projects.
Open the [Settings] panel:
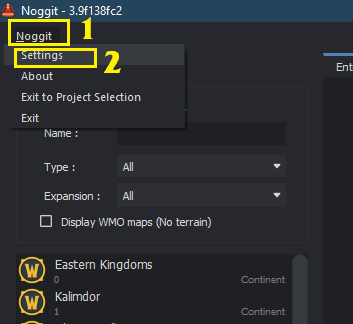
In the settings, enable the [Modern features] option:
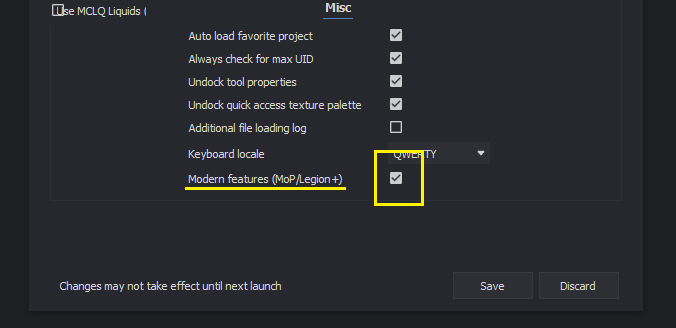
Click [Save] and close Noggit.
Step 3 — extraData folder and global.cfg
Inside your projects folder, create a folder called extraData and place the global.cfg file you downloaded earlier inside it.

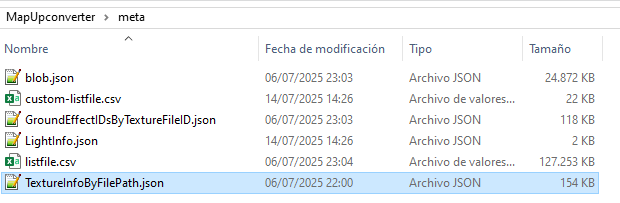
Next, go to the Map Upconverter GUI folder you downloaded in step 1. Create a folder called meta inside it, then place a copy of global.cfg there — renamed to TextureInfoByFilePath.json.
If you'd prefer to skip the renaming, you can download the file already renamed here: https://drive.google.com/file/d/1NyvlFa3Pj-pQV46bADC7jQ0cBY0Cyuew/view?usp=sharing
4 — Your first project
For every new project, create a new folder inside your projects directory.
In Noggit, create a new project and set the paths again:
Select whichever map you want to edit — and you're ready to go!
Once you're done editing, save your work and export it to Epsilon.
Next steps:
To edit a modern map, see: https://docs.google.com/document/d/1JwAfvu1efA288rXxWgAZZLIFQweJ75q9rApANx3Owa8/edit?usp=sharing "PART 1: IMPORTING A MODERN MAP"
To export your map to Epsilon, see: https://docs.google.com/document/d/1JwAfvu1efA288rXxWgAZZLIFQweJ75q9rApANx3Owa8/edit?tab=t.0 "PART 2: EXPORTING A MAP TO EPSILON"